
How to Make an Ultrasound Frame
 For this final post in my stamping with polymer clay series, I thought I'd use the heat embossing technique from my video to create a polymer clay frame.
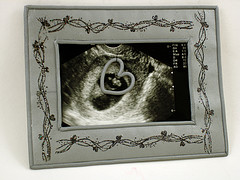
If you've ever had an ultrasound photo you wanted to frame — whether it's to share your own good news with friends and loved ones, or to frame your soon-to-be-grandchild's photo on the fridge — you've probably run into two problems. First, ultrasound photos aren't always a standard size (2 5/8" × 4", for example). And second, well, honestly, they're not always great photos. Sometimes it's hard for the un-educated eye to find which part is the baby. Today's project is a stamped polymer clay magnet frame that fixes both of those problems. It's easy to make the frame in any size. And the hand-formed hanging heart will highlight the important part of the photo.
Even if you don't have an ultrasound photo you need to frame, you can use these steps to quickly frame any size photo with polymer clay!
Materials
- Photo and card stock to copy photo onto for template
- Approximately 3/4 block of strong polymer clay
- Rubber stamp(s)
- Pigment or embossing ink
- Embossing powder
- Liquid clay
- Thread
- Tape
- Button magnets
- Super glue
- Tools: pasta machine or brayer; clay blade; baking surface; ruler; heat gun; clay extruder (optional)
Instructions
- Start by copying your photo onto card stock. Trim off any white edges, so all you have left is photo. Now trim off another 0.25" both ways. This copy will serve as your template for the opening of the frame. You want the opening to be a little smaller than the photo itself (thus the extra 0.25"), to allow the photo to stay in place without exposing any edges.
- Determine your outer frame size. This will depend mostly on the size of your image. So, for example, if your image is 2 5/8" × 4", you could add a 0.5" margin to each side, making the frame 3 5/8" × 5". Another factor to consider is the stamp you're using to decorate the frame. If it's a skinny stamp or small pattern, you don't need as much of a border as you would for a stamp with a large pattern.
 Roll out your clay sheet to your desired frame size. This sheet needs to stand alone, so don't make it too thin. I'd recommend about the 3rd or 4th thickest setting on your pasta machine. Put the clay sheet directly on your baking surface, or on an oven-safe material like card stock. Otherwise, it will be difficult to move the frame without distorting it after the next step.
-
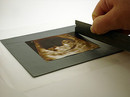 Center the photo template on your clay sheet. You may want to use a ruler to verify that it's actually centered. Now use a clay blade to trace around the edges of the template.
 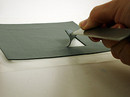 Remove the photo template and carefully remove the inner portion of the frame. Try not to distort the outer frame sections while you're doing this. Bake clay according to manufacturer's recommendations and allow to cool.
-
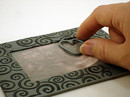
 Apply pigment or embossing ink to your stamp(s). You may want to practice on scrap paper first if you're new to embossing, or if you're uncertain about your stamp layout. Once you're ready, stamp the clay, then sprinkle the wet ink with embossing powder. Remove the excess powders, then emboss with a heat gun. (For full instructions, see my video on heat embossing.)
 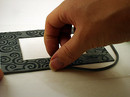 Use your clay extruder to roll out a clay snake (or roll it out by hand if you don't have an extruder). Apply a light layer of liquid clay along the inner and outer edges of the frame, then adhere the snake to the edges. I cut my corners at an angle to give it a mitered look.
-
 Create another snake for the dangling heart. My snake was 3" long — but you'll want to adjust yours to fit your photo. One good way to measure how large your heart should be is to lay down wax paper over your photo template, then form the extruded heart on that. This gives you a nice work surface while still allowing you to see through and gauge size.
 - Bake frame and heart.
 Assemble your frame. Tie a thread around the heart. Center the photo in the frame's opening, then tape three corners down on the back. Leave one top corner un-taped so you can sneak the heart's thread between the photo and frame. Once you have the heart centered over the baby-part of the photo, tape down the thread and the remaining edge. Apply button magnets to the corners with super glue.
Variations
- This one-part frame is meant to be quick and easy. But if you're making a gift for someone, you may want to do a more elegant three-part frame: a front piece, a spacer piece, and a back piece. Victoria Hughes's Polymer: The Chameleon Clay
book has an excellent tutorial, complete with templates, for doing this.
- The hanging heart could be dressed up a bit by using jewelry findings (jump rings, chain, etc.) instead of thread to hang it. You could even connect the jump ring directly to the clay frame, though this would make the heart's position permanent and prevent you from swapping out photos later.
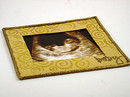
- Or, if the little girl or guy in question is big enough and baby-shaped enough, you may not need any highlighting. In that case, leave off the heart altogether like I did in this second example.
More About This Project
Speaking of ultrasounds, if you're wondering why I chose this particular project... well, it's cuz I have a few ultrasound photos of my own I need to frame! Yep, hubby and I are expecting our first little one in mid-February. The photo at the top is of our little guy or gal five weeks ago (at eight weeks). Since then it's grown from kidney bean- to shrimp-sized and probably looks a lot more like a baby!I hope you've enjoyed the ultrasound frame project, along with the other posts in this rubber stamping polymer clay series. The full list of posts is below. And, as always, I'd love to hear from you. Tell me your favorite polymer clay rubber stamping tip in the comments below.
Posts in This Series:

Comments
Congratulations!! February, huh? February babies are the best. ;o)
I love the idea of the hanging heart to spotlight part of the photo!
Posted by: Michael | August 8, 2008 7:50 AM
What a cute idea! I used to just hang the best picture on the fridge w/a magnet. LOL! This is a great way to display (and un-cryptify the often confusing) pictures.
And congrats on spilling the beans about the bean! :) I hope you both are doing well. I'm jealous you get to do the beached whale stage in the winter months. That is sooo much better, IMO. :)
Posted by: Christie | August 8, 2008 9:41 AM
That is a very cool idea!
And Congratulations!!!
Posted by: Tsoniki | August 8, 2008 9:52 AM
Thanks Tsoniki, Christie & Michael! My husband's a February baby too, Michael -- so I'm sure he'd agree with you on that. I'm an August baby myself, but as Christie mentions, the hugely-pregnant-in-midsummer part doesn't sound like much fun (sorry Christie -- I don't envy you!). So yeah, February works great for me!
Posted by: Angela Mabray | August 8, 2008 10:05 AM
Mazal tov and congratulations. My boys are my blessings.
Posted by: Toby/DrMom | August 8, 2008 3:14 PM
Congrats!!!
All the best to your family!
Cassy's bday is in Feb. =)
Posted by: April | August 9, 2008 9:33 AM
Thank you both, April & Dr. Mom.
My mom was always "Dr. Mom" to us when we were hurt -- hopefully I can live up to that someday too. :-)
Posted by: Angela Mabray | August 13, 2008 2:35 PM