Main

February 17, 2011

Name StampsThe baking (and maybe even sanding & buffing!) is all done. You've finished a polymer clay masterpiece, and you're proud of it. But how do you put that final mark on it to show you made it?

There are lots of options for signing your work. Some artists use a polymer clay-compatible pen or marker (try Krylon or Prismacolor) and sign their actual name. Others use initials, a business logo or another unique symbol.

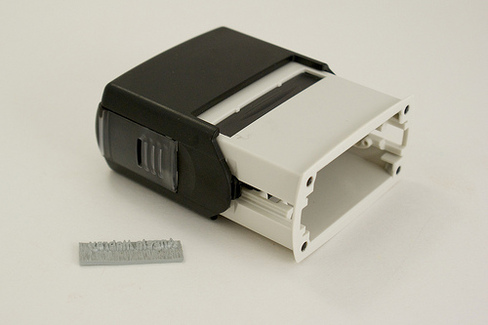
Another easy and nice-looking option is to use a stamp. Custom rubber stamps are available from a variety of sources, but I've found address stamps to be the right size and a good price. And they're very flexible in their uses. You can use them before or after baking, with or without ink. (Here's more tips on stamping polymer clay.)

I originally just used my normal mailing address stamp on unbaked clay, positioning the stamp close enough to the edge of the clay piece so it would impress only the top line (my name) and not the address lines. But I've since bought a stamp that only has my name. I purchased both stamps from VistaPrint, who offers a basic rubber stamp for "free" (you pay about $6 in shipping/handling charge). In addition to the free basic stamps, VistaPrint has the option of uploading artwork, signatures, etc. for address and signature stamps that start at $9. They send a plastic stamp casing if you want to assemble it, but I keep my name stamp unmounted and trim it down to a very small size for easy positioning on the clay.

Of course, I have to admit that I don't always remember to sign my work. Until recently, it just never occurred to me. Do you sign your work? How?

May 7, 2010

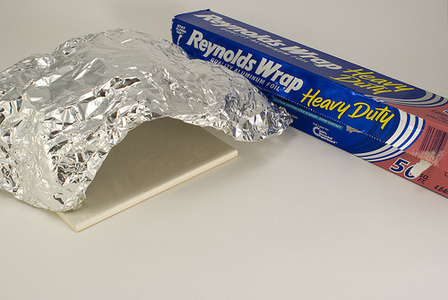
Tenting with FoilThis is a tip a lot of you have heard of. I'm writing about it because, while I had heard of it, too, I was skeptical that it would make a difference. Turns out I was wrong...

My polymer clay ovens get a bit moody sometimes. And it seems like that "sometimes" is usually right in the middle of a big deadline.

My previously-reliable oven had started under-baking things, a fact I didn't realize until some of my "finished" clay mosaic tiles were crumbly instead of nice and strong. (My oven thermometer had fallen off the shelf onto the element below, and I kept forgetting to retrieve it when the oven was cool. My bad.) A whole day's worth of clay stuff was under-baked, a fact I found especially frustrating since I was furiously working on projects for my book deadline.

Continue reading "Quick Tip: Tenting with Foil" »

March 26, 2010

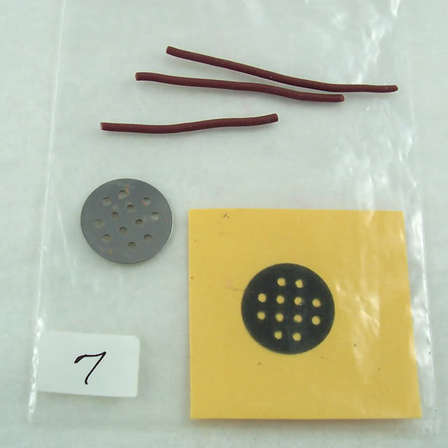
Extruder Cheat Sheets by Carolyn GoodA couple of years ago, I posted about my Extruder Disk Cheat Sheet. To make it, I put all my extruder disks on the scanner, then printed the resulting scan on a transparency sheet. I glued samples of each disk's extrusions on the transparency and used the "cheat sheet" to help me figure out which disk to use for a particular project.

Carolyn Good of 2GoodClaymates took this idea and ran with it... and I think the result is an improvement. You can see her post on the Polymer Clay Smooshers blog. What I like about her version is that the use of plastic baggies allows her to remove those sample extrusions. This makes it much easier to try them out for size on a particular project. (That, plus keeping polymer clay pieces glued to a ultra-flexible transparency sheet is kinda tricky.)

Thanks to Carolyn for sharing her suggestion!

August 18, 2009

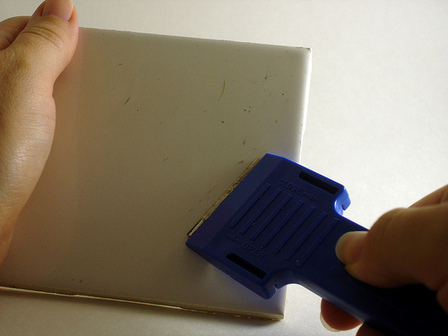
Cleaning Ceramic TileIf you've used ceramic tiles as a working or baking surface for very long, then you've probably had to clean them. It's easy enough to use an alcohol-soaked paper towel to wipe off surface dust, and even baked-on clay remnants can usually be scraped off with a fingernail. But if you've ever tried to clean up baked-on liquid clay or embossing powders, you know it can be a bit of a challenge.

Here's a quick tip: Use a scraper made for ceramic oven tops to clean those tiles. Any sharp blade will work, actually, though you don't want to mess up your good clay blade for a cleaning job.The nice thing about the oven scrapers is they're inexpensive and safe to use. It just takes a minute to scrape off the cooked-on stuff, which you can then wipe away with a damp paper towel. Easy as that!

April 21, 2009

sundae by ginnerobotViolette Laporte's Inside Out blog just had a good tip for making mokume gane easier:

Instead of curving your blade to do the shaving of thin slivers, I like to curve the polymer clay sheet and use a straight blade. To give my clay sheet a gentle curve, I place it on a large jar (or an ice cream container).

Read the whole thing here: Tip # 31

Not only does Violette give us a way to make mokume gane and mica shift easier... but she encourages us to empty an ice cream container first in order to do so. Best tip ever!

For another neat mokume gane trick, check out Tonja Lenderman's Scrap Polymer Clay Mokume Gane Sheet tutorial (found via CraftGossip Polymer Clay). Instead of stacking multiple sheets of clay, she recommends chopping up scrap clay to make a single sheet. Fun clay recycling tip — and just in time for Earth Day!

April 16, 2009

Measuring same amounts of claySometimes, when you need two pieces of about the same amount of clay, you can eyeball it and get close enough. But sometimes you want to be a little more exact. For example:

  • Making same-sized parts: Earrings look best if they're both the same size (unless you're trying for that uneven look!). Same goes for strands of beads.
  • Color-mixing recipes: If you're mixing 3 parts yellow and 1 part orange to get the perfect color, it's nice to have a defined size for each "part."
  • Re-creating previous projects: For products I sell, I like to keep detailed instructions so I can re-create an item. Knowing measurements means it's much easier to make this pair of earrings the same size as the last pair the customer ordered.

Here's an easy way to accurately measure polymer clay:

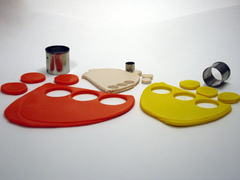
  1. Roll out a sheet of clay to any thickness you like on your pasta machine. (If you're writing instructions for later, make a note of the thickness you chose.)
  2. Use a cookie cutter to cut out a circle of clay.
    • For color-mixing, each circle of clay is a "part" — so the cutter's size and shape don't really matter.
    • Otherwise, make a note of which size of cookie cutter you used. I use a Sharpie to number my cookie cutters, starting with 1 as the smallest, so I can just make a note of which number cutter I used.

Got your own favorite way to measure polymer clay? I'd love to hear it — just leave me a comment!

November 25, 2008

Sharpening Clay BladeI got a nice email from Janet, who read my review of Studio by Sculpey's Super Slicer Blades and had a suggestion for my old dull blade:

"I read a tip once (from Lisa Pavelka I believe) that you can sharpen your blades by running them through a sheet of sandpaper. Maybe you can try that on your original blade."

Sure enough, a couple of Lisa Pavelka's books have blade-sharpening tips. And an online search found a few more. If you have a dull clay blade you need to sharpen, here are some resources:

I sharpened my old blade, and I have to say I'm happy with the results. I used a sanding block, starting with 400 grit sandpaper for my super-dull blade and progressing up to 1000 grit. It took all of about 10 minutes, and while I wouldn't say my blade's as good as new, it's definitely better than it's been in years!

Of course, you should be very careful sharpening these blades. And don't forget to handle your blade more carefully once it's sharp again. I don't wanna hear about any severed fingers!

Thanks to Janet for the tip. While it's sometimes tempting to just replace tools (especially the relatively-inexpensive ones), it's often better to buy better-quality tools to begin with and maintain or repair them whevever possible.

August 12, 2008

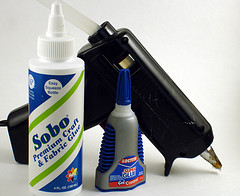
Glue FavesMickey was making compacts with polymer clay on top, and she e-mailed me to ask which glues work best:

"They say E6000 pops off easily and Crafter's Pick Ultimate Glue also pops off. Any suggestions?"

As the good folks over at This to That will tell you, glue choices depend a lot on what you're gluing together. Not every glue works well for every surface. But here are a few of my favorite glues to use with polymer clay:

Continue reading "Quick Tip: Which Glues Work Best with Polymer Clay?" »

July 2, 2008

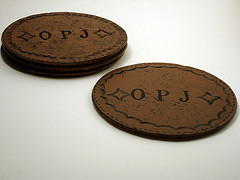
Faux Leather Monogrammed Coaster SetI love that Irene Semanchuk Dean's Faux Surfaces in Polymer Clay book has two parts for each imitative surface: first a recipe, then a project. Not only does she show you how to mix up a realistic-looking mother-of-pearl, but she also shows you how to incorporate that into a typical mother-of-pearl inlay project, enhancing the perception that it's the real thing.

Her book helped me look at faux in a whole new light. It's not only how good the surface looks — it's also what you do with it. Your faux turquoise surface may look perfect, but you have to consider shapes and sizes of natural turquoise if you want to really hit the mark with your finished project. If a stone is typically carved, then digging out your carving tools after baking will help make it look more realistic.

And the same applies to leather. If you lived through the 70's, you probably had a leather kit with carving tools and hand stamps. So what says leather more than those familiar motifs?

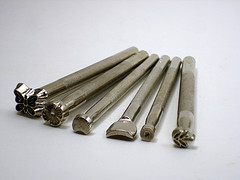
Leather Stamp SetAvailable at some craft stores or online, leather-working tools are a great addition to your polymer clay stash, especially if you want to give faux leather a realistic look. The nice part is that polymer clay takes the impression of these stamps much more easily than leather. (If you have trouble with the metal tools sticking to your clay, try dusting the clay with cornstarch or spritzing it with water first.)

Some of the tool kits also include patterns. Mine had great tips for combining individual stamps to create borders and other designs. Using their ideas made it easy to create good-looking designs that have a definite leather look to them. (You can also find free leather patterns on Tandy's site.)

I got my set of 7 Tandy leather tools at my local Hobby Lobby for $16.99 and have really enjoyed them. Combine these tools with this great leather recipe from Polymer Clay Web for a fun faux leather look.

June 20, 2008

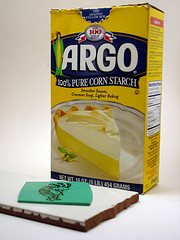
Using Corn Starch to Prevent Air BubblesDon't you just hate air bubbles? Your polymer clay piece may look perfect when you put it in the oven, but then those air bubbles appear during baking and ruin the look. There are various ways to prevent bubbles, such as conditioning the clay properly (don't trap air inside clay folds as you run it through your pasta machine), or looking for and popping air bubbles trapped when you're covering something with clay.

But my tip today is specifically for the air bubbles that are created when you're baking a flat sheet of clay — the sort of sheet you might use for stamping or scrapbooking punches or for Artist Trading Cards. I've found that, especially if I work on the same surface I'm baking on, the clay may stick to the baking surface in places. It's easy to trap air in the places where it's not stuck, in which case the sheet may end up as a bubbly and not-so-flat sheet after baking.

Here's how to prevent those air bubbles. Put a light dusting of cornstarch all over your baking tile. The cornstarch will prevent the polymer clay from sticking to the tile, which helps prevent the bubbles.

If you're working and baking on the same tile, try lifting the polymer clay sheet up before baking to make sure it's not stuck. Dust with cornstarch before you replace the polymer clay sheet.

Once you've baked the clay, you'll want to wash and sand off any extra cornstarch, at least if the back of your clay sheet will be visible in your project. That may mean an extra step if you're not normally a sander. Still, I find this is much easier than trying to sand down the air bubbles that would otherwise appear on the project's surface!

I've been dusting my baking tiles with cornstarch for a while now and have noticed a definite improvement. Give it a try & let me know if it works for you!

May 16, 2008

Box of Pearl and Embossing PowdersHere's a quick tip for storing your Pearl Ex & embossing powders so it's easy to find the right color at a glance.

I used to store my Pearl Ex powders in their original box, carefully organized numerically (because I'm picky that way). However, when I reorganized the last time, I found that it made more sense to keep all the pearl & embossing powder bottles together in one large box. While this worked much better from a storage aspect, it created two new problems:

  • It was trickier to keep them in just the right order, something that was important if I was using my Pearl Ex Color Strip to find the right color.
  • The original Pearl Ex boxes stored the bottles vertically, so I could see the color from the side. In my new storage box, all I saw was their little black lids, which all look exactly the same.

To fix these problems, I spent a little time creating samples and labelling the lids:

Continue reading "Quick Tip: Organizing Pearl Ex & Embossing Powders" »

May 14, 2008

A Perfect SquareNeed to cut a polymer clay square but don't have the right size cookie cutter? Here's an easy way to get a perfectly straight-edged square (or rectangle) every time:

  1. Step 1: Find graph paperFind a sheet of graph paper. If you don't have any -- or if the grid on yours is the wrong size to be useful -- you can print your own graph paper online, selecting just about any size grid you like. If you know what size you need your polymer clay square to be, count out how many squares that equals on the grid (i.e., 7 across by 7 down). It may be helpful to outline the edges with a pen or highlighter, especially if you'll be re-using the template to cut lots of pieces the same size.
  2. Step 2: Lay clay on wax paperPlace the graph paper under a sheet of wax paper. (Working directly on the paper could lead to an accidental image transfer.) Roll out a sheet of clay to the desired thickness, and lay it on top of the wax paper. It helps if you press it down lightly so it sticks to the wax paper -- that way it won't wiggle while you're cutting.
  3. Step 3: Cut the ClayLine up your clay knife with the grid lines, and cut out your square. Viola -- perfect every time!

This post is the first in a new category on my blog: Quick Tips. It'll be a spot for me to jot down interesting observations & quick tricks I've found useful -- and with any luck, a spot where you'll discover some new things now & then too!

About this Site

CraftyGoat's Notes is all about sharing polymer clay tips & tricks that have worked for me. (And even a few that haven't!)

Read more about CraftyGoat's Notes...

Buy My Book

Archives

Enter your address to get CraftyGoat's Notes by email:

Delivered by FeedBurner