
Other Ideas for Polymer Clay Bottle Cap Jewelry
I've talked about making basic bottle cap jewelry and liquid clay bottle cap jewelry. Now I want to share a few ideas for using polymer clay with bottle caps, by putting the clay either inside OR outside the bottle cap.
 Covering the Inside of the Bottle Cap
-
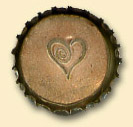
How To: Covering the inside of a bottle cap with polymer clay can be pretty simple. These are the steps I took for the Metallic Heart Bottle Cap Necklace:
- I conditioned white Premo! polymer clay, and rolled it out on the thickest setting of my pasta machine.
- Using the bottle cap as a guide, I cut out a small circle to decorate. Note: On my sample, I did a bad job of measuring, so my clay didn't quite go to the edges of the bottle cap. Hopefully you'll measure better than I did!
- I used a heart stamp that had been dusted with Pearl Ex powders to press into the clay. I rubbed in a mixture of Pearl Ex powders to color the remaining clay, then I used my paintbrush bristles to texture it.
- I put a small dab of Translucent Sculpey (TLS) in the bottom of the cap to serve as a glue. Then I placed my decorated polymer clay circle in the bottle cap and baked it.
- More Ideas: While it can be as simple as this project, covering the inside of a bottle cap with polymer clay can also be as elaborate as you want. I think a collage with polymer clay and some hardware store finds would look good. Or maybe something with a colorful, geometrical 3-D look.
Covering the Outside of the Bottle Cap
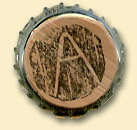
- How To: Covering the back side of the bottle cap is also an option. Here are the steps I took for the Bottle Cap Monogram Necklace:
- I mixed together several shades of brown Premo! clay until they were marbled, but not yet blended. I used my pasta machine to roll the clay to a medium-thickness sheet (#3 on an Atlas-brand pasta machine).
- I reverse-printed the monogram onto card stock using my laser printer, then trimmed the edges so they were more rounded.
- I transferred the image onto the clay. I used a paintbrush to spread rubbing alcohol on the back surface of the card stock (I usually do this at least twice, allowing the alcohol to dry between coatings). Once the image had transferred, I removed the card stock.
- I used the open end of the bottle cap to punch out a circle around the transfer, then trimmed the edges so it fit the back side of the bottle cap.
- After letting the clay sit a while (to prevent the transferred ink from smearing when I touched it), I put a bit of TLS on the bottle cap and put my polymer clay circle on top.
- I baked it, then sanded the edges.
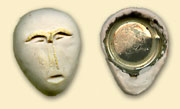 More Ideas:This method also has various possibilities. I've used the back of a bottle cap as the base for a mini polymer clay mask, and I'm sure it could be used as a base for various other structures.
Something I've wondered about when decorating the back of the bottle cap, though, is whether the sharp-looking edges of the cap would be comfortable against the skin. My skin is a little sensitive, so I don't think I would want to wear a necklace that pressed metal edges against me. Other people are selling things like this, so there may be a solution. I think I'll try dipping the bottom edges in some liquid clay to give it a clear plastic coating -- that might do the trick without affecting the look. Or if you've got a good answer for this, let me know.
These are just a few ideas for using polymer clay with bottle caps... I'm sure there's a ton more that can be done. I'd love to see what you come up with!
