
How to Make Bottle Cap Jewelry with Liquid Clay
 In my previous post, I talked about the basics of making bottle cap jewelry. Now I'd like to tell you how to make jewelry using liquid polymer clay:
- Find or print an image. Just as with the paper collage bottle caps, you'll want to cut the paper a bit larger than the bottom of the bottle cap. Do any coloring or stamping on your paper image now -- before you put it in the bottle cap.
- Use alcohol inks to tint your liquid clay. Be careful -- one drop goes a long way!
- Use a paintbrush to spread a thin layer of liquid clay in the bottom of the bottle cap. Now smooth the paper image down inside the cap and paint a layer of liquid clay on top of it. Be sure to get liquid clay around the edges to smooth those down.
- Bake at 275° for 15 minutes.
- Add another thin layer of liquid clay and bake again. Repeat if necessary to get the right "look" for your project.
- You're done! Add a jump ring, attach it to a necklace, and just wait for the compliments to come pouring in!
Just a couple of notes:
- I was using recycled bottle caps, and was initially a little worried that the little clear seal inside the lid might not be oven-safe. I didn't notice any fumes or burning when I baked my bottle caps, but if you're worried about it, just buy some new caps that don't have the seal.
- If you want to get rid of the paper, you can do an image transfer to the liquid clay. But if you do that, you may want to add a layer of light-colored clay to the bottom of the bottle cap to make the transfer more visible.
- I used Kato's Clear Medium Liquid PolyClay for mine, but Translucent Liquid Sculpey (TLS) would also work. It would result in a little cloudier image, but that might be just what you need for your project.
- Craft stores sell paint containers that are just like the paint-by-numbers sets from when I was a kid. These are great for mixing and storing tinted liquid clay.
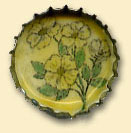
In my next post, I'll share a couple of other ideas for using polymer clay with bottle caps. But if you can't wait that long -- or if you prefer shopping to crafting -- then take a look at CraftyGoat.com. The Yellow Flowers Bottle Cap Necklace and a couple of other bottle cap necklaces are now available.

Comments
Hi..im having trouble with the image paper im using as it is absorbing the glaze im using and the image is being warped. Also if im using photographic images im having trouble sticking them to the base of the cap and they keep lifting away. Any ideas on the paper type i should be using, as i want to be able to print off my own images from my computer...many thanks !
Posted by: janine | June 15, 2007 7:11 AM
Janine, Sorry about the delay -- I couldn't remember what paper I used for this, so I wanted to re-try it before answering your question.
First, when you say the image is being warped, do you mean the paper itself is warping...? If so, the problem could be the paper. I used cheap paper for this -- I tried both copy paper (Main Street 20lb white) and card stock (Georgia Pacific 110lb white). You might try one of these papers and see if it fixes the problem. I haven't tried any kind of image or photo paper.
If you're still having problems, you might just need to "convince" the paper to stay in place. Many bottle caps have an uneven bottom surface, so it's a little tricky to get paper to stick around the edges. First, be sure you've put down a decent layer of liquid clay (I'd use Translucent Sculpey for the bottom, since it's thicker) to level things out & act as a bit of a glue. Then, if you're using a thin paper (like the copy paper I used in the original project), cut the paper a little larger than the bottle cap so you have extra around the edges. Before you add the top layer of Kato PolyClay, use the blunt end of a small paintbrush to press the paper down into the edges of the bottle cap.
If you're using card stock or a heavier paper, it might work better to cut the circle to the exact size and let the combined weight of the paper and liquid clay hold it in place.
And just in case you mean the *ink* is the part with the problem, here's a couple of tips for preventing smearing. First (this is probably too obvious), be sure you're using a laser printer or waterproof ink jet. Second, even with the laser toner, it will start to smear if you mess around with the liquid clay too much. Where I had this problem was when I was trying to use the colored liquid clay directly on top of the image. Since it takes a while to get the colors evened out, I ended up smearing the ink by brushing it a few too many times. If that's happening, try doing a quick coat of clear liquid clay and baking it, then adding a colored layer on top of that.
Hope that helps!
Posted by: Penni Jo Couch | June 26, 2007 2:49 PM
Thanks for the tips ! very helpful :)
Posted by: janine ashton | June 27, 2007 6:16 AM
What website do you suggest I purchase unused bottle caps for this project?
Posted by: Stan Thomas | December 25, 2008 11:39 PM
Stan, I bought my un-used bottle caps on eBay. If you want the flattened, framed look (like these caps), try searching for "flattened silver bottle caps scrapbooking" or similar terms.
Posted by: Angela Mabray | December 29, 2008 10:47 PM
hi
Thanks for the wonderful ideas and excellent description
Posted by: t | May 21, 2010 12:33 AM