
How to Take Better Photos of Your Work
 Pam sent me a nice email the other day. She's thinking about starting an Etsy shop and asked the following question:
"I'm wanting to photograph my work but have no idea whatsoever how to showcase the color, texture, etc. Obviously, just sitting a piece on a countertop and taking a picture doesn't work ~ so, what do I need to get started (cheaply) to take some really nice, crisp photos?"
I'm no photo expert. In fact, I used to really hate taking photos. Until a couple of years ago, I tried to get away with scanning everything — cards, jewelry, even 3-D items. But I finally decided to work on photography, and it's made a huge difference. So here are 5 tips that helped me improve my photos:
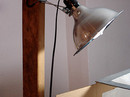 Start with great lighting. Some folks have access to great natural lighting, setting up next to a window or even doing all their photos outdoors on sunny days. Our house doesn't have the best lighting — and I'm just not patient enough to wait for a pretty day to take all my photos — so we bought some clip-on lights and some daylight spectrum light bulbs. Since we wanted a solution that would work for lighting both photos and videos, we found a tutorial and put together some homemade light stands to clip the lights onto.
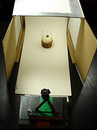
Use a light box. Using the clip lights (or other bright light sources) by themselves isn't ideal. Bright lighting creates more shadows and harsher colors than soft, filtered lighting. One easy way to control your lighting is to use a light box. My light box is the one thing that made the biggest improvement in my photo quality — and it was cheap and simple to make, following Strobist's light box tutorial.
In front of my light box, I have a mini-tripod set up. Tripods help get a stable, non-shaky picture (shaky pictures are blurry pictures). And since my mini-tripod doesn't always give me the height I want, I keep a stack of notebooks to set the tripod on. I'll add some or take some away, depending on the angle I want for a particular photo.
- Get to know your camera. I used to be afraid of cameras, but when I decided to get serious about taking better photos, I took the time to explore my camera's different functions. Glance through the manual, or just flip through the menus. You might find it has a function that's just what you need.
For example, when I'm doing photo tutorials and need to photograph both my hands doing something, I use my camera's delay setting. (You probably need a tripod if you want to try this yourself.) I'd done this for quite some time with varied success — sometimes it worked great, but sometimes I'd move at just the wrong second and get a blur. It was a bit of a pain setting the timer up and doing the pose again. One day I found the multi-burst function on my camera, which takes multiple photos in quick succession. One or two may be blurry, but there's a pretty good chance I'll get at least one good one in the series. Exploring your camera's options may help you make a similarly useful discovery.
Speaking of cameras, it's easy to get overwhelmed by all the camera options out there. If you're buying a new one, read some reviews from a trusted source, preferably from people who have used the camera in ways similar to how you'll be using it. But keep in mind that you don't have to have the newest, highest resolution camera to get a good picture. - Get some software. I always do some clean-up on my photos after shooting. Usually I just crop it down and do any necessary color correction. If there are specks or dirt, I'll also use my software's healing brush tool to get rid of those. Because of my computer background, I have (and prefer) the full Adobe Photoshop package. But it's expensive and has a pretty big learning curve — so it's probably not be the best choice if you're a beginner or just doing basic photo editing. I've heard good things about the cheaper and more scaled-back Photoshop Elements... and there are plenty of other options. Here's a few software reviews to get you started.
- Finally, play. The nice thing about digital cameras is that you can try lots of things and get rid of the shots you don't like. Try different angles to see which one works best for a particular photo. Notice photo styles you like on Flickr and Etsy, then translate those preferences into a style that's your own. Try photos with and without background props to see what appeals to you. (This Etsy how-to video has some tips on backgrounds, among other things.) As you practice and play, you'll start to discover what feels most comfortable to you.
I still have a lot to learn when it comes to photography, but after following these steps, I can tell a real improvement in my pictures. And the best part is I actually enjoy it now! When I write tutorials, I have fun trying to figure out the best way to tell the story through pictures. And when I find myself with a good pic (or get a compliment on Flickr), it feels great.
I hope these tips help Pam and any of the rest of you who are trying to take better product photos. I'd love to hear what works for you, too.
