
Quick Tip: Organizing Pearl Ex & Embossing Powders
 Here's a quick tip for storing your Pearl Ex & embossing powders so it's easy to find the right color at a glance.
I used to store my Pearl Ex powders in their original box, carefully organized numerically (because I'm picky that way). However, when I reorganized the last time, I found that it made more sense to keep all the pearl & embossing powder bottles together in one large box. While this worked much better from a storage aspect, it created two new problems:
- It was trickier to keep them in just the right order, something that was important if I was using my Pearl Ex Color Strip to find the right color.
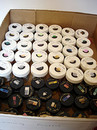
- The original Pearl Ex boxes stored the bottles vertically, so I could see the color from the side. In my new storage box, all I saw was their little black lids, which all look exactly the same.
To fix these problems, I spent a little time creating samples and labelling the lids:
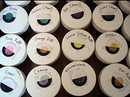 Embossing Powder Samples: As you probably know, powders often look very different on a dark background than they do on a light background. For the embossing powders, I punched circles from black & white card stock, then used embossing ink & a heat gun to create samples of each powder color. I glued half of each circle to the embossing powder lid. (I used the other half to create a paper reference guide, in case I want to take a list of what I have to the store with me.)
- Pearl Ex Samples: I had already made sample strips of Pearl Ex powders on black and white clay. I simply cut these apart and super glued them on top of the appropriate bottles.
- Labelling Lids: I then wrote the color name on top, just in case I was looking for something specific. (Metallic pen worked well for the Pearl Ex powder's black lids.) I almost wrote in the numbers too, but then I would have felt obligated to keep them in order. And believe it or not (hubby does not), I occasionally try to reign in my compulsive tendencies! :-)
If I were doing this again, I would make thin clay sheet samples instead of using the bulky strips I had. Since my lids aren't flat, I can't stack those bottles now. It's not a big deal for me -- but it might be something to keep in mind if you try it at home.

Comments
I am amazed that your bottles are all similar/identical! You should see my mess! Maybe that's why I spend more time looking for things than actually creating anything!
Love your tips! :)
Posted by: France | May 16, 2008 10:05 PM
Angela, what a fantastic idea! I did something similar with my paints by putting a dab of the paint on each lid, but the way you have done the embossing and mica powders on the different colored backgrounds is BRILLIANT!
Posted by: Cindy Lietz | May 20, 2008 12:48 PM