
How to Make Bottles of Hope
My guild had an excellent speaker this past weekend, a breast cancer survivor who's helping us get more involved in the Bottles of Hope program. I put together this information for our meeting & wanted to share it with you too.
What Are Bottles of Hope?
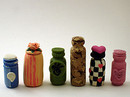 Bottles of Hope are polymer clay-covered bottles that are given to cancer patients to share hope & cheer. The Bottles of Hope (BOH) program was started in 1999 by cancer survivor and polymer clay artist Diane Gregoire. She covered empty medicine bottles from her treatment and took them to other patients, telling them to write a wish and put it inside. The program grew, and now polymer clay artists worldwide create the bottles to give to cancer patients.
Preparing the Bottles for Covering
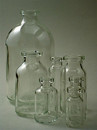 You can cover any kind of bottle, or even other "vessels" like PVC pipe. But if you're going the traditional route and covering a medicine bottle, here are a few tips to help you prepare it for use:
Removing the Lid & Stopper
The medicine bottles with a rubber stopper and metal top can be a little tricky to open. Give these methods a try: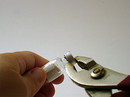 Use pliers to pry the lid off from the bottom edge. You may need to go around and pry a few spots for this to work.
- The metal is fairly thin, so it cuts or tears fairly easily. Working from the hole in the center of the top, use needle-nose pliers or metal snips to make cuts in the metal, then pry it off. (Wear gloves if you're using this method -- the tools and the metal can be sharp.)
Cleaning & Preparing
- Soaking: You can soak the bottles overnight in soapy water, then rinse them out. This may also help remove any paper labels.
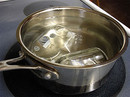 Boiling: You can also boil the bottles (as long as you remove the lids first). This has the added advantage of eliminating any contamination concerns.
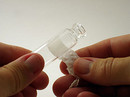 Removing Labels: Paper-based labels are easier to remove after soaking. The plastic labels remove easily even before soaking. Just use fingernails or tweezers to lift an edge, after which the label should peel right off.
Covering Basics
Here are some basic covering instructions to get you started making your own Bottle of Hope.
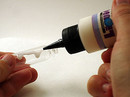 Coat Bottle with TLS: Coat your bottle with a very thin layer of liquid clay. This step is optional, but I find that the honey-like consistency of the liquid clay helps catch the clay sheet and keep it in place as I'm working. Some folks coat their bottles with glue instead, letting it dry before they add the clay.
 Roll out & Trim Clay Sheet: Use your pasta machine to roll out a polymer clay sheet big enough to cover the bottle. Lay the clay sheet on your work surface, and lay the bottle on top of it. Make straight cuts alongside the top, bottom, and one side of your clay sheet to align it with the bottle.
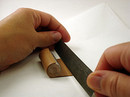 Cover Bottle: Roll your bottle and the clay til you've covered the bottle in clay. Roll back enough to cut along the line where the clay sheet touched. Smooth the seam. Use a knitting needle or other rounded tool to press in the neck area of the bottle.
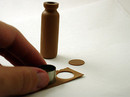 Make a Lid: Make a flat disk for the top and bottom. Small round cookie cutters are wonderful for this, if you happen to have the right size. Otherwise, you can create a cardstock template the right size. You can use the original rubber stopper as part of your lid, or you can make your own stopper by pressing a polymer clay plug into the bottle's top. Cork stoppers are another attractive option. Keep in mind that you don't want to bake your bottle with an air-tight lid (such as the rubber stopper) in place. Trapping hot air inside the bottle during baking could be dangerous!
Of course, these steps are just a jumping off point. Part of the fun is making your bottle unique. Your sheet might be a Skinner blend or be covered with canes. You might add some sculpted items to your sheet-covered bottle. Or you might dispense with the sheet altogether. The Galleries section below has some wonderful design inspiration -- some designs leave much of the bottle bare, and some designs are elaborate sculptures whose base happens to be a bottle. Have fun as you experiment with the different options!
Extras
- Tags: Some polymer clay artists create wonderful themed bottle and tag sets. For example, local cancer survivor Cindy received a beautiful dragon bottle from artist Susan deWit. Inside the bottle, a tiny heart dangles from a chain attached to the lid. The handwritten tag reads, "The cancer dragon has been slain -- the heart beats strong." Consider ways you can personalize your bottle to make it extra special to its recipient.
- Motivational Quotes: You don't have to come up with your own sayings either. Find motivational & hope-themed sayings in a quotes book or online. Browsing these quotes may even spark some new bottle ideas!
Helpful Websites
General Info
- Bottles of Hope: The official site for the Bottles of Hope program. Includes history, gallery, printable brochure & tags, and more.
- Glass Attic: Bottles of Hope: Glass Attic's Bottles of Hope page covers a wide range of information and includes links to lots of other sites.
- Dephi Forums: Bottles of Hope: The Delphi Bottles of Hope forum includes sections on resources, getting started, and more.
- SCPCG Bottles Of Hope: The Southern Connecticut Polymer Clay Guild, where BOH originated, has a nice summary of the bottles' history.
Tutorials
- March 2004 PcPolyzine Making Bottles of Hope: PCPolyzine's tutorial covers the basics of bottle-covering. Page 2 includes a chart of colors that represent specific types of cancer.
- Covering glass vials with Polymer Clay: Basic bottle-covering tutorial.
- How To Make Bottles of Hope: My video of bottle-covering basics.
Galleries
- SCPCG BOH Gallery: A gallery of BOH from Clay Connection 2000
- Small Bottles: Glass Attic BOH Gallery. Also includes a few how-to photos.
- Amaco Bottles of Hope First Auction: Amaco's Top 25 BOH from their Winter 2007 Designer Challenge
- Amaco Bottles of Hope Designer Challenge: Top 25 BOH from the Summer 2007 Amaco Designer Challenge
- Flickr: Search Flickr for "bottles of hope" to find bottles others have shared.
Other Resources
- American Science & Surplus Bottlemania: If you don't have access to used bottles, this site offers unused ones for a reasonable price.
- Cherry Lane Collection Quotes: Find motivational quotes at this site or many other similar sites. These are wonderful for including with your bottle -- either inside or as a separate tag.
