
Unconventional Polymer Clay Tools 2: The Herb Mincer
 Last time I shared how I use a pumice stone with polymer clay. Today I'd like to introduce you to another of my repurposed favorites...
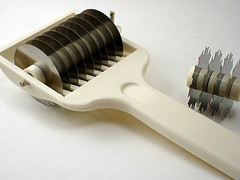
The Herb Mincer
Need strips of clay for your project? The Makin's Clay Extruder ships with a couple of different "ribbon" discs, but you're limited to those widths & thicknesses. Of course you can roll out a sheet of any thickness in your pasta machine, and just use your clay knife. But it can be tricky to get straight cuts that are all the same width. This is where the rolling herb mincer comes in handy.- What It's Good For: Its original purpose is cutting up leafy herbs, but I think it works even better for slicing fixed-width strips of polymer clay.
- How to Use It:
- Use your pasta machine to roll out a long, thin sheet of clay at whatever thickness you like.
- Lay the clay sheet on a work surface you can also put in the oven -- i.e., card stock, parchment paper, wax paper, etc. Use an acrylic brayer to press the clay into the work surface. This will prevent the clay from sticking to the rollers as you cut.
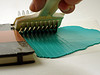
Roll the herb mincer across the clay to create thin strips. You can even run it across twice -- once horizontally and once vertically -- to create a perfect grid of polymer clay squares.
If you need straight lines, it may help to set up a barrier (such as a thick book) on one side, then keep one edge of the herb mincer pressed against the barrier as you roll.
- Depending on what you're doing, you can use these as is -- just peel off a strip and use it. Or you can transport your work surface to the oven and bake the strips to avoid distorting those perfect lines. If you find that you didn't cut all the way through the clay before baking, it's okay. Your clay will be scored -- after baking, you can easily snap it apart or follow the scored lines with a craft knife to cut it.
Where to Find It: Department & kitchen stores. Amazon.
If you can find them, styles like mine with removable spacers/blades are nice because they allow you to adjust the width of your clay strips. Also be sure to look for the the rolling-style herb mincers -- not herb mills. The latter works by crushing the herbs in an internal wheel -- & while that works well for herbs, I suspect it'd be a gunked-up mess with polymer clay.
- Similar Ideas: I haven't tried these similar tools with polymer clay yet -- but they look like they'd each work well, providing different effects. If you do try them, I'd love to hear how they work for you!
- Atlas Pasta Bike: Same idea as the herb mincer, and also has adjustable space between the wheels. Plus it's for pasta -- and we all know how well pasta tools work with polymer clay!
- Roller Docker: Looks ideal for making evenly spaced dots on a sheet of polymer clay.
- Lattice Pie Top Cutter: Need a latticework fence for an outdoor scene? Do it the easy way with this tool!
Got your own unconventional, re-purposed, or handmade polymer clay tools? Tell us about it here and/or on Lisa's original post.

Comments
I am not that handy in the kitchen so I had noooo clue there was such a tool as the lattice pie top cutter!!! WOW, and I used to think it was all done by hand..
I played with Mokume Gane this weekend and used the sprial part of a notebook and a tip of a fork to make texture in my Mokume Gane, if you would like to see a picture you can go here: http://flickr.com/photos/kreativekarma/2276426344/
Thanks for this article and your prior one, sometimes it hard for me to imagine common tools that are right under my nose!
Posted by: April | February 18, 2008 9:44 PM
It looks like you *can* do a lattice top by hand (here's instructions) -- but I imagine the cutter makes it much easier. But I don't know for sure -- I've never attempted a pie that ambitious!
Your mokume gane looks great, and the photo's great too. The spiral notebook & fork are great (unconventional) choices. Thanks for the suggestions!
Posted by: Angela Mabray | February 18, 2008 10:59 PM
Thanx so much for the link to that tutorial, it came in handy, and I spend a WHOPPING $0! Although I will soon be purchasing better back-dropy-thing-a-ma-bobber-inos.
♥MD
Posted by: Michelle | February 21, 2008 7:14 PM
Glad it was helpful, Michelle... $0 is my favorite project price!
Posted by: Angela Mabray | February 24, 2008 3:46 PM