
Mold Putty Wrap-Up & Giveaway
 To conclude this mold putty series, I wanted to share a few additional mold putty tips & tricks. Plus, I'm giving away a project pack that includes everything you need to try your hand at molding.
More Mold Putty Tips & Tricks
- How much putty to use: When you're new to molding, it's hard to know how much putty to use. What I like to do is picture how much clay I'd use to make the item I'm molding, then use 2-3 times that much putty. In other words, if the button I'm molding would take about 1 teaspoon of clay to make, I'll probably use 2-3 teaspoons (combined) of the mold putty mixture. Of course, you may like thicker molds, so as always, play around and figure out what works for you.
- What to do if you mix too much putty: Once you've mixed the two mold putty parts together, you have to use it (no putting it back in the container). To avoid wasting putty, keep a few extra buttons handy, and mold those with any leftover mixture.
- What to do if you didn't mix enough putty: If you've worked quickly and still have some time before the putty gets too firm to take an impression, measure out some more putty and add it in. Apply extra pressure as you're rolling it into a ball, and beware of creases. If the putty's already starting to firm up, it's probably best to go ahead and let it set. Then use more mold putty to "patch" the weak or incomplete areas, letting the whole thing set again before using it.
- Mold-baking fun: I mentioned previously that Amazing Mold Putty is oven-safe. While I haven't found that to be a huge advantage for normal clay use, it does create some interesting options for liquid clay. Try tinting some liquid clay with alcohol inks and putting a small amount in the mold's impressions. Fill the rest with "normal" clay for a neat effect.
- More mold putty uses: Amazing Mold Putty is FDA compliant, so you could also use it for things like candy & jello molds -- keeping your polymer clay molds separate from your food molds, of course. Granted, you're the folks who use your pasta machines for clay instead of for pasta, so maybe you find food uses irrelevant! :-)
Additional Resources
Button Tips- Glass Attic's Buttons page has lots of useful advice for creating your own buttons.
- Sarajane's Polymer Clay Buttons page includes more button info, plus links to photos of buttons that have been washed and dried many times. (The trick is using a strong brand of clay!)
- Planning to make your own texture sheets? Michael at MossyOwls shares a list of ten places to find textures -- most of them in your own home!
- Dystini also shares some ideas for finding textures.
Now Available: Mold Putty Project Pack
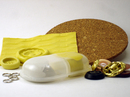
For those of you who are interested in trying Amazing Mold Putty -- but aren't ready to invest in the large package at the craft store -- I've put together a Mold Putty Project Pack that includes the supplies you'll need to get started:- 1 oz Amazing Mold Putty (enough to make 5-10 small/medium-sized button molds)
- A variety of buttons to mold
- Jump rings to use as button shanks
- A sheet of cork, perfect for practicing your texture sheet technique
- Project instructions and high-quality videos on CD, including the articles and videos in this series PLUS a bonus list of 100 texture ideas.
Project Pack Giveaway
I'm giving away one of my Mold Putty Project Packs, plus I'm also throwing in some extra basket-weave & button molds I made during my videos. (Authentic movie props. Ooh-la-la!)To enter, just leave a comment below by 11:59 P.M. CST on Sunday, February 10th, 2008. One entry per person, please. You can either share a molding tip of your own, or you tell us what you'd like to make a mold of. I'll randomly select a commenter and announce the winner on Monday. Update: This contest is now closed. Find out the winner here.
Course, if you'd like to go ahead & buy the project pack now, that's fine too. Go ahead & leave a comment -- if I pick your name, I'll refund your money.
Good luck to everyone!
Other posts in this series:
- Review: Amazing Mold Putty
- How to Make Your Own Molds with Amazing Mold Putty
- Video: How to Make Button Molds & Buttons
- Video: How to Make Your Own Texture Molds
- Mold Putty Wrap-Up
Start molding today with the Mold Putty Project Pack.

Comments
I really love your mold ideas.. they've given me many!
Posted by: Carlie | February 7, 2008 5:06 AM
I am newer to the "mold" rage. But I would love to start with one of your pack (free is even better) and then I can tell you what I learn! :)
Posted by: Angela Mabray | February 7, 2008 2:57 PM
I'm still learning and have a whole bunch of things to try. So far the best part is to nip off the back of button shank with my super- duper wire cutters so the mold will lay flat on the surface.
Posted by: judy | February 7, 2008 6:32 PM
Ohh a give away! Thanks =)
I am limited in mold knowledge, but an idea I have is to figure out how to create a 3D mold. (I haven't tried it yet) but I figured I can make something like a nice sculptured 3D heart, and cover it with the amazing mold putty (good even coverage around it, and once it's dry, make a nice even slice around the center of the mold to expose two seperate molds, that can work as one to create a 3D object. Think it's possible?
Posted by: April | February 7, 2008 9:35 PM
Thanks for the comments, folks -- and thanks for the button shank tip, Judy.
April, I played with 3-D molds briefly but haven't really figured them out yet. If you haven't already, I'd recommend taking a look at this 2-page article from Polymer Clay Central:
* http://www.polymerclaycentral.com/cyclopedia/molds_owl.html
* http://www.polymerclaycentral.com/cyclopedia/molds_owl2.html
It talks about 2-part molds and 3-D molds, & has photos of both. Hope that helps!
Posted by: Angela Mabray | February 7, 2008 11:15 PM
I don't have a website at this time. Just watched your video, it was great. Been thinking of trying to make a mold from pc. Please enter me in the drawing. Thanks, Vicky
Posted by: vicky edwards | February 8, 2008 5:25 PM
Hi,
Your tutorials and tips are really helpful. I would like to make a mold of the molding on a hanging lamp that has broken. Our house is only 3 years old and the lamp was installed them. It is an ornate lamp, but it runs out that the molding is plastic and it broke. So, I want to use polymer clay to replace that portion of the molding, but of course it must fit color, style and size. I am a bit intimidated by it.
Posted by: Beth | February 8, 2008 7:44 PM
I love the tutorial for using mold putty. It is something I probably wouldn't have tried on my own, but now I have lots of ideas swimming 'round my head! Thanks!
Posted by: Mary Peterson | February 10, 2008 11:29 AM
Oh, I'm a day late and a dollar short for the giveaway- darn! But I thought you'd like to know I linked out to your You Tube video on my latest post on SBS Texture sheets... keep up the great craftin'!
Posted by: Jenny | February 11, 2008 9:40 AM
Thanks to all who replied -- you guys have some great ideas! Good luck, Beth, with the lamp mold. It does sound a little intimidating -- but I think the mold putty will be a helpful tool for you. Let me know how it turns out!
The giveaway winner has been posted here.
Posted by: Angela Mabray | February 11, 2008 2:55 PM
I have been making baby molds - But can never get a really good impression - This product looks so much nicer to work with
Please consider me for your free give-away
Posted by: Carri Haeckel | February 18, 2008 10:26 AM
Thanks for the comment, Carri, and good luck with the baby molds. I think this product will be helpful in getting the detail you need for features.
You missed the deadline for this giveaway -- but stay tuned for more in the future.
Posted by: Angela Mabray | February 18, 2008 11:03 PM
Great information, but Michaels and Hobby Lobby both have coupons in the newspaper, online and sometimes in the store for 25,40 and sometimes 50 percent off one item. Great savings!
Bob D
Posted by: Bob D | August 31, 2008 7:00 PM
Yep, I love those coupons too, Bob! I hope you'll read the rest of the mold putty series -- I actually mentioned using a coupon in one of the earlier posts.
Posted by: Angela Mabray | August 31, 2008 7:34 PM
I was wondering if you can use Amazing Mold Putty for hard candy? Hard candy that the temperature is about 310. Will it handle that kind of heat?
Posted by: Amanda | October 19, 2008 4:16 AM
Amanda: I haven't tried it with candy, but according to the Amazing Mold Putty FAQs, it is "food grade compliant up to 395 degrees F." So it sounds like it should be fine for your purposes. The FAQs also mention pre-heating, etc. -- so you may want to take a look there before you get started. Good luck!
Posted by: Angela Mabray | October 19, 2008 8:45 PM
Great ideas!
I want to make molds to use with polymer clay.
Please enter me in giveaway.
Posted by: Paula | December 8, 2008 6:27 PM
I have made several texture molds with Amazing mold putty, but I would like to make a reverse mold. Can I do this using Amazing mold Putty without a release agent? If not, what release agent can I use without damaging the original?
Posted by: Christine Coffey | August 19, 2009 1:30 AM
Thanks for the comment Christine. Since Amazing Mold Putty sticks to itself, I don't know of a way to directly make a reverse mold. Maybe you could try using another material, such as Super Sculpey?
Posted by: Angela Mabray | September 9, 2009 4:59 PM