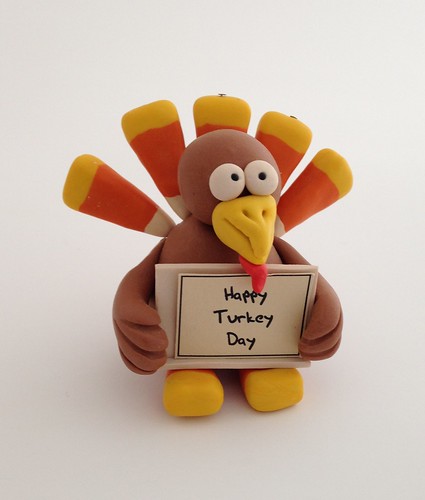
It's Turkey Time!
Polymer clay artists are likely to think of something completely different when someone mentions putting the turkey in the oven! This polymer clay turkey would be a fun addition to any Thanksgiving festivities -- even more fun when you come up with creative ideas for your own personalized signs. Here's how I made my turkey -- no basting required!
Materials
- Polymer clay: tan, orange, yellow, white, red, black
- Tools:
- Pasta machine
- Clay knife, toothpick, and/or other clay sculpting tools
- Translucent Sculpey (TLS)
Instructions
 Make candy corns. See my candy corn tutorial for instructions. I made 7 candy corns -- 5 to use as feathers and 2 to use as feet -- and I put eye pins in the feather candy corns before baking. If you have time, go ahead and bake the candy corns first. It'll make it easier to stick them into the turkey later.
 Make the sign. I wanted to make it easy to change the turkey's "message," so I created a blank slate with a ledge at the bottom to prop up printed signs. To do this, I rolled out a sheet of white clay to a medium thickness on my pasta machine and cut it to about 1" tall by 1.25" wide. I also cut a thin strip the same width and "glued" it to the bottom using TLS. I baked my sign at the same time as my candy corns, again to make it easier to put the whole thing together without distorting the smaller pieces.
Make your turkey's body. My turkey's body was based on the raven instructions from Joshua Burkhardt's Hangin' Around With Noah, so I won't go into all the details here. (The book is inexpensive, a fun read and great for beginners, so I'd recommend it if you're thinking about making some polymer clay animals.)
In fact, I'd originally planned for my turkey to have jute legs like Joshua's creatures do -- but decided in the end that I liked his feet snuggled up to the sign. Two additional notes on things I did differently:
 Once the body is created, evenly space the feather eye pins across the back of the turkey (it helps to start from the middle and work outwards). Press the feet onto the body, carefully ensuring that the turkey is well-balanced enough to sit upright. Prop the sign on top of the feet, wrapping the turkey's fingers around the sign's edges. Now bake the whole thing according to the manufacturer's instructions (a thicker piece like this will take a little while), using polyfill or other oven-safe props as necessary to hold him upright during baking.
Variations
- Change up the sign. As an alternative to printed signs, you could use an image transfer for the sign or create the sign with your label maker. And what should the sign say? Here's the ones I sell my turkeys with -- use them as springboards for your own ideas:
- Welcome
- Happy Turkey Day!
- Eat More Ham!
- Add real feathers: Using real feathers would give your turkey a completely different look.
- Accessorize. A pilgrim's suit and hat would look awesome.
Good luck creating your polymer clay turkey -- I'd love to see what you come up with. And whether you're sticking a polymer clay turkey in the toaster oven, or basting and stuffing the real thing, I wish you all the best this Thanksgiving!


