
Web Design Gets Crafty: How to Use Polymer Clay on your Web Site
 How do you design a crafty blog? Well, with Photoshop, a little imagination... and of course, some polymer clay! At least that's how we did the recent design here at CraftyGoat's Notes.
The site design has been a work in progress, and there's still a few tweaks to make. But now that it's mostly complete, I thought I'd share a little about how we did it.
My inspiration came from a piece of We R Memory Keepers scrapbook paper. I liked the mosaic look, so I decided I wanted to use polymer clay to create a mosaic tile background for my web site header.
Step 1: Make the Tiles
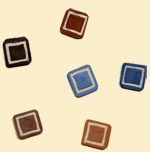
I made a total of 14 tiles -- 2 each of 7 colors (light and dark blue, light and dark brown, black, gold and dark red). I probably could have gotten away with making just 1 of each color, but this gave me a little more variety. Here are the steps to follow if you want to make your own tiles.- Choose the colors for the tiles. Roll out the polymer clay sheet to a medium thickness (#3 on an Atlas pasta machine).
 Create a stamp. Anytime you're making several of the same design in polymer clay, it's helpful to make a stamp or mold. In this case, I used scrap clay to create my stamp -- adding a thin raised outline of a square to a flat square. When you're done, bake the stamp and let it cool. Note: At first I just placed the raised pieces straight onto the clay square -- a move I regretted when a piece fell off while I was stamping. For best results, use Translucent Sculpey (TLS) to adhere the clay pieces.
- Next, decide how wide you want the clay tiles, and cut a strip of clay to this width. Dust the sheet with baking soda or corn starch (or a mixture of the two) to prevent it from sticking, then use the stamp to make impressions, spacing them appropriately. Cut out the individual tiles, but don't worry too much about making the squares perfect (the variance is what makes these look handmade). Bake all the tiles and let them cool.
- To create the contrasting color on the stamped line, use a mixture of Sculpey and TLS to create a grout of sorts. Press this into the indentions, then scrape off the extra with a clay knife. If you've got a film left after scraping off the extra, it may help to clean the ungrouted areas with a Q-tip soaked with rubbing alcohol. Bake again.
Step 2: Create the Mosaic
I could have made an actual mosaic -- with grout between the tiles and everything -- but that would have required making a lot more little tiles. Instead I used Photoshop CS to create the mosaic. While these instructions refer to Photoshop, other image programs offer similar features.- Scan in the tiles. Crop out the background, leaving just the image. When you're done editing each image, save each one to the same size (mine were all 50 pixels square).
- Create a new Photoshop image large enough to hold your finished mosaic. Now figure out how much space (how many pixels) you want between your mosaic pieces. You may want to play with this a little, moving things around on the screen until it looks right.
- Add guides to Photoshop to show you where to place your tiles. If you want 4 pixels in between your 50-pixel tiles, and you want your mosaic to be 4 tiles high, you'll create horizontal guides at 4, 54, 58, 104, 108, 158, 162, 212. And the same method applies to creating the vertical guides. You may want to turn on "Snap to Guides" to make working with guides easier.
- With all your tile images still open in Photoshop, start cutting and pasting tiles into the little guide "squares" you've created on your mosaic "canvas." You could use some pattern to decide where to place each color, or you can do it randomly. I assigned each tile a number, then used random.org to come up with a random image pattern to follow.
Step 3: Add the Finishing Touches
The tiles and mosaic were a big chunk of the design, but there were quite a few finishing touches needed. Here are just a few:- I picked a color from one of my tiles, then used that to create a matching background using Photoshop's "Coarse Weave" pattern overlay.
- I created the "CraftyGoat's Notes" header text using Exotc350 Lt BT font.
- I created a tile image to use as a part of each blog post's header. This ties the body of the page in nicely with the header.
I'm pretty happy with how the site turned out. I like the idea of making something original -- creating a web site that reflects my craft. Anyone can use clip art or templates. But crafters can create something that's truly one-of-a-kind -- whether it's a unique header, a cool background, or custom-made navigation buttons.
Have you incorporated your craft into your web site design? I'd love to see it. Or if you'd like a web site that refects your craft -- but you aren't the technical type -- then you may want to consider Crafty Goat's sister company, Smart Goat Web Design. However you do it, make sure your site is as unique as you are!
