
TLS Image Transfers, Part 2
 In the first part of my TLS image transfer series, I did a baseline test with various papers I already had on hand, changing variables like the thickness of the TLS and the baking temperature. This time I'll show you my results using Hammermill paper, which is a brand I've seen recommended for transfers. I'll also share my results using an embossing heat gun to set a TLS transfer before baking it in the oven.
Hammermill Color Copy Paper
I read in this Sculpey tutorial that Hammermill Color Copy Paper in Photo White is good for transfers -- apparently it contains a higher clay content and lower cotton content, meaning it doesn't stick to the transfer as much. So I ran down to a local xpedx store that has free sample sheets of papers available, and got 3 different weights of the paper. Unfortunately I didn't write down the weight on each one -- so these are just my best guesses:
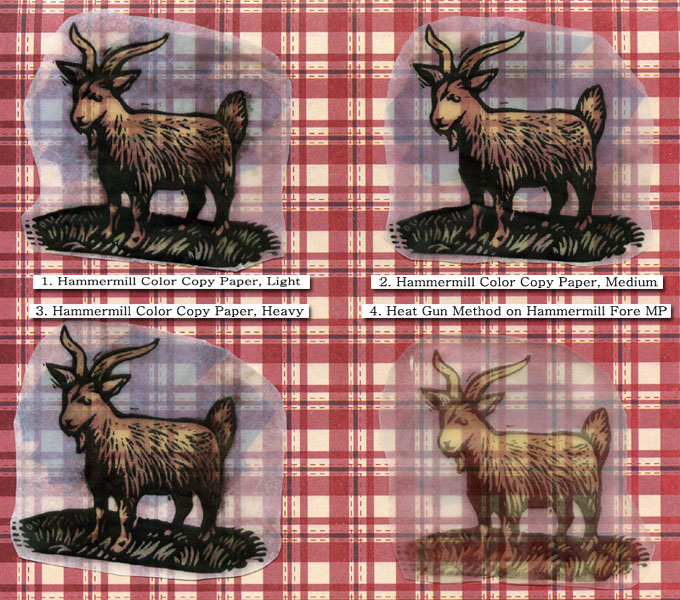
- Hammermill Color Copy Paper, light-weight (probably 28 or 32 lb?)
- Hammermill Color Copy Paper, medium-weight (60 lb?)
- Hammermill Color Copy Paper, card-stock (80 lb.?)
All three papers were much easier to rub off after baking, but my results with the lingering fibers were mixed. The card-stock was so-so, and the lightest-weight paper was a little better than so-so. Neither was great, though. The medium-weight paper, on the other hand, was the best result so far. There was very little left-behind paper fiber, making for a clearer, cleaner end result. I'd definitely recommend it.
So of the papers I've tried, the two I think worked best were the Hammermill Fore MP ivory 20 lb. paper and the Hammermill Color Copy Paper in Photo White (medium-weight). I suspect the ivory color may be part of the reason the Fore MP was in my final two -- instead of the bright white fibers that really stand out, its fibers blend in a little better. Of course, since a particular project determines what blends in best, it might be worth experimenting with different colored papers for different projects.
Heat Gun Method Next I tried curing the transfer with a heat gun instead of the toaster oven. (I read about this method on Michael's Translucent Liquid Sculpey Techniques page.)
Here's the steps I followed:
- I spread a thin layer of TLS on the color-laser-printed image and let it sit a few minutes to settle.
- Using my heat gun (a hair dryer might work too), I heated the image from 1-2 inches away, until the TLS looked fairly clear (3-4 minutes).
- I used my clay knife to slice between the transfer and the paper. Once I got an edge pulled up, the whole thing peeled off fairly easily.
- I then baked the transfer for 15 minutes in the toaster oven to make sure the ink was set (it did smear a bit before I did this).
The good news is there was no paper fiber residue at all. The transfer was very clean. While the TLS sheet was still less clear than I liked, I was happy to get rid of the paper fibers.
The bad news is the transfer wasn't nearly as dark -- the colors weren't as vibrant, the blacks weren't as black. I'm sure this would be a good effect for some projects -- kind of a faded look. But it seems like it would be a major drawback for others.
Still, this process was significantly easier -- no soaking the transfer in water, no rubbing bits of paper off. So I'd recommend trying it to see if it works for your particular needs.
For my next post, I'll try the Kato Liquid PolyClay Clear Medium. It advertises having a "clear finish" (vs. "translucent"), so I'm excited to see what it can do!
Other posts in this series include:
